由于官方文档有些内容没更新,搭建环境过程中可能会遇到各种问题,这里把搭建过程中踩过的坑记录一下,作为对官方指引的一个补充。
官方文档:https://reactnative.cn/docs/integration-with-existing-apps
一、关于 RN 版本
- 目前RN最新版本是0.71.4,因0.71.0后依赖的文件结构有变化,但文档是有些地方没更新,比较多坑。建议使用0.71.0以下。
- 从 RN 0.64 开始,要求Android minSdkVersion>=21,即5.0以上、gradle7.3.3,如果要降到 19,只能把RN版本降低至0.63.x
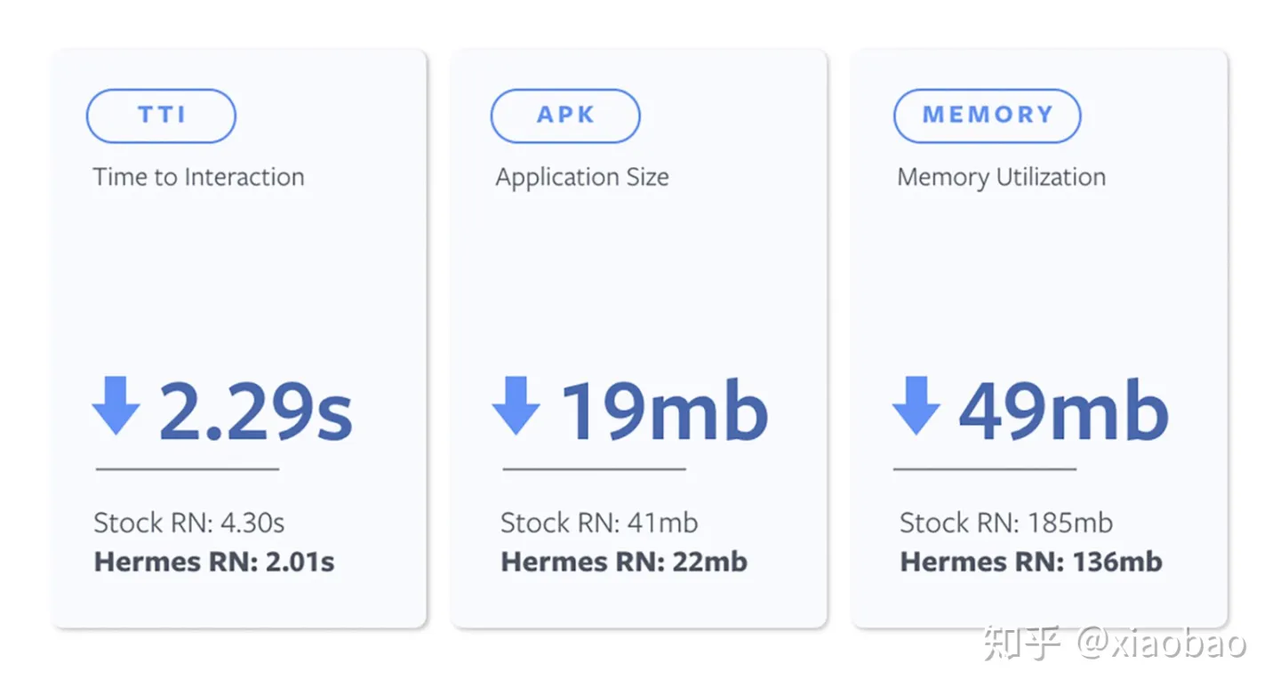
- 0.64开始支持Hermes JS 引擎,需要手动配置开启,0.70以上默认开启。Hermes对启动时间,包体积、内存占用都有较大的优化:

- 同时考虑到0.69以上最低支持到IOS13,目前业务需要支持IOS11,综合评估使用0.68版本
- 版本差异对比工具:https://react-native-community.github.io/upgrade-helper/?from=0.63.4&to=0.64.0
二、RN 运行环境搭建
1. 配置项目目录结构
首先创建一个空目录用于存放 React Native 项目,然后在其中创建一个/android子目录,把你现有的 Android 项目拷贝到/android子目录中。
2. 安装 JavaScript 依赖包
在项目根目录下创建一个名为package.json的空文本文件,然后填入以下内容:
{
  "name": "MyReactNativeApp",
  "version": "0.0.1",
  "private": true,
  "scripts": {
    "start": "yarn react-native start"
  }
}
使用 yarn 安装 React 和 React Native 模块。请打开一个终端/命令提示行,进入到项目目录中(即包含有 package.json 文件的目录),然后运行下列命令来安装: 这里指定版本0.68.0,默认是最新版本0.71.4
$ yarn add react-native@0.68.0
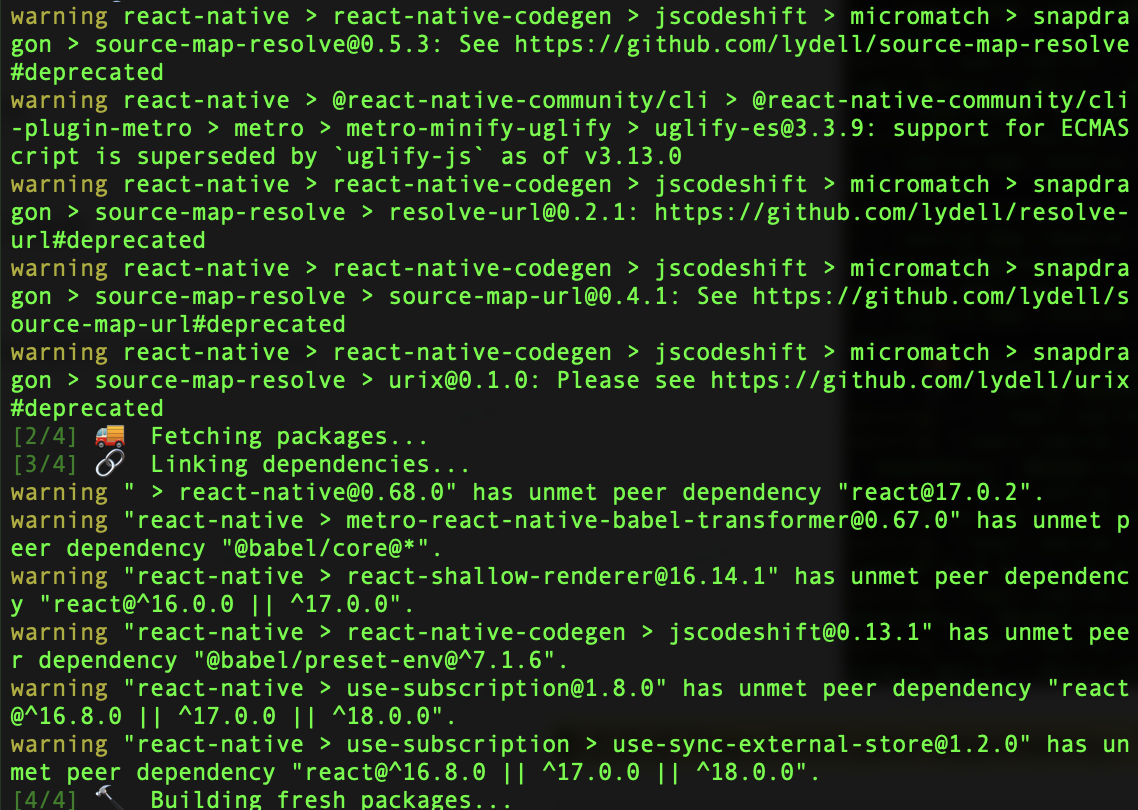
安装完成后往回拉,可能会出现如下警告:

重点关注“has unmet peer dependency…”的警告,并运行以下命令,按要求安装对应的依赖:
$ yarn add react@17.0.2
$ yarn add @babel/core@
$ yarn add @babel/preset-env@7.1.6
$ yarn add uglify-js@3.13.0
$ yarn add typescript@3.6.0-beta
所有 JavaScript 依赖模块都会被安装到项目根目录下的node_modules/目录中(这个目录我们原则上不复制、不移动、不修改、不上传,随用随装)。 把node_modules/目录记录到.gitignore文件中(即不上传到版本控制系统,只保留在本地)。
集成 RN 到已有项目中
1. 配置 maven
在你的 app 中 build.gradle 文件中添加 React Native 和 JSC 引擎依赖: dependencies { … implementation “com.facebook.react:react-native:+” // From node_modules implementation “org.webkit:android-jsc:+” } 在项目的 build.gradle 文件中为 React Native 和 JSC 引擎添加 maven 源的路径,必须写在 “allprojects” 代码块中
allprojects {
    repositories {
        maven {
            // All of React Native (JS, Android binaries) is installed from npm
            url "$rootDir/../node_modules/react-native/android"
        }
        maven {
            // Android JSC is installed from npm
            url("$rootDir/../node_modules/jsc-android/dist")
        }
        ...
    }
    ...
}
如果在gradle7.x 的settings.gradle有如下配置,需要去掉:
dependencyResolutionManagement {
    repositoriesMode.set(RepositoriesMode.FAIL_ON_PROJECT_REPOS)
    repositories {
        google()
        mavenCentral()
        maven {
            // All of React Native (JS, Android binaries) is installed from npm
            url "$rootDir/../node_modules/react-native/android"
        }
        maven {
            // Android JSC is installed from npm
            url("$rootDir/../node_modules/jsc-android/dist")
        }
    }
}
2. 启用原生模块的自动链接
要使用自动链接的功能,我们必须将其应用于几个地方。首先,将以下内容添加到settings.gradle:
apply from: file("../node_modules/@react-native-community/cli-platform-android/native_modules.gradle"); applyNativeModulesSettingsGradle(settings)
上面这一步需要确保AndroidManifest.xml配置了package,否则Gradle sycn会失败 参考:https://stackoverflow.com/questions/58952564/error-unable-to-determine-the-current-character-it-is-not-a-string-number-ar
<manifest xmlns:android="http://schemas.android.com/apk/res/android"
    package="com.example.rntest"
    xmlns:tools="http://schemas.android.com/tools">
接下来,在app/build.gradle的最底部添加以下内容:
apply from: file("../../node_modules/@react-native-community/cli-platform-android/native_modules.gradle"); applyNativeModulesAppBuildGradle(project)
3. 配置权限
接着,在 AndroidManifest.xml 清单文件中声明网络权限:
<uses-permission android:name="android.permission.INTERNET" />
如果需要访问 DevSettingsActivity 界面(即开发者菜单),则还需要在 AndroidManifest.xml 中声明:
<activity android:name="com.facebook.react.devsupport.DevSettingsActivity" />
开发者菜单一般仅用于在开发时从 Packager 服务器刷新 JavaScript 代码,所以在正式发布时你可以去掉这一权限。
4. 允许明文传输(http 接口) (API level 28+)
从 Android 9 (API level 28)开始,默认情况下明文传输(http 接口)是禁用的,只能访问 https 接口。这将阻止应用程序连接到Metro bundler。下面的更改允许调试版本中的明文通信。
- 为 debug 版本启用 usesCleartextTraffic选项 在src/debug/AndroidManifest.xml中添加usesCleartextTraffic选项:
<!-- ... -->
<application
  android:usesCleartextTraffic="true" tools:targetApi="28" >
  <!-- ... -->
</application>
<!-- ... -->
如果希望在正式打包后也能继续访问 http 接口,则需要在src/main/AndroidManifest.xml中也添加这一选项。 要了解有关网络安全配置和明文通信策略的更多信息,请参阅此链接。
5. 测试集成结果
你已经完成了将 React Native 与当前应用程序集成的所有基本步骤。现在我们将启动Metro bundler来构建index.bundle包,并通过本地主机提供服务。
- 运行 Metro 服务
运行应用首先需要启动开发服务器(Metro)。你只需在项目根目录中执行以下命令即可:
$ yarn start - 运行你的应用
保持 Metro 的窗口运行不要关闭,然后像往常一样编译运行你的 Android 应用(在命令行中执行./gradlew installDebug或是在 Android Studio 中编译运行)。
或者合并上面两步直接运行:
$ yarn android6. 打离线js包
通过以上步骤智能在模拟器成功连接Metro运行,真机运行不了,但可以把 js bundle 打成离线包,放到assets文件夹成功运行,打离线包命令:
$ react-native bundle --entry-file index.js --bundle-output ./android/app/src/main/assets/index.android.bundle --platform android --assets-dest ./android/app/src/main/res --dev false
7. 输出Log
react-native log-android
react-native log-ios
8. 常见问题
如果在Metro reload出现异常,可以通过以下命令react-native info查看环境是否有问题,有可能是环境变量没配等问题。
三、热更新方案
业内使用最多的是微软的CodePush框架,优势包括:
- 微软出品,大厂保证
- 良好的多环境支持(Testing,Staging, Production)
- 灰度发布、自动回滚等等特性
- 良好的数据统计支持:下载、安装、出错一目了然
- 强大的 CLI 工具,一个终端搞定全部流程 同时微软也提供了AppCenter托管平台,在调研阶段我们先使用它来测试,正式接入时需要私有化部署我们自己的CodePush服务。
参考:https://github.com/microsoft/react-native-code-push/blob/master/docs/setup-android.md#plugin-installation-and-configuration-for-react-native-060-version-and-above-android
https://github.com/microsoft/react-native-code-push/blob/master/docs/setup-android.md#plugin-installation-and-configuration-for-react-native-060-version-and-above-android
1. 安装环境
安装Appcenter命令工具
$ npm install -g appcenter-cli
其他依赖
$ yarn add superagent@7.0.2
$ yarn add react-native-code-push
2. Android 项目添加依赖
在 android/settings.gradle 文件末尾添加
include ':app', ':react-native-code-push'
project(':react-native-code-push').projectDir = new File(rootProject.projectDir, '../node_modules/react-native-code-push/android/app')
在android/app/build.gradle添加
apply from: "../../node_modules/react-native-code-push/android/codepush.gradle"
Application.java添加
...
// 1. Import the plugin class.import com.microsoft.codepush.react.CodePush;

public class MainApplication extends Application implements ReactApplication {

    private final ReactNativeHost mReactNativeHost = new ReactNativeHost(this) {

        // 2. Override the getJSBundleFile method in order to let// the CodePush runtime determine where to get the JS// bundle location from on each app start@Overrideprotected String getJSBundleFile() {
            return CodePush.getJSBundleFile();
        }
    };
}
3. 在Appcenter创建应用
appcenter apps create -d MyApp-Android -o Android -p React-Native
创建部署
appcenter codepush deployment add -a <ownerName>/<appName> Staging
appcenter codepush deployment add -a <ownerName>/<appName> Production
查看appcenter DeploymentKey
appcenter codepush deployment list -a zruilin/RNTest --displayKeys
4. 配置DeploymentKey
把DeploymentKey添加到项目strings.xml
 <resources>
     <string name="app_name">AppName</string>
     <string moduleConfig="true" name="CodePushDeploymentKey">DeploymentKey</string>
 </resources>
或者在android/app/build.gradle中配置
android {
    ...
    buildTypes {
        debug {
            ...
            // Note: CodePush updates shouldn't be tested in Debug mode as they're overriden by the RN packager. However, because CodePush checks for updates in all modes, we must supply a key.
            resValue "string", "CodePushDeploymentKey", '""'
            ...
        }
        releaseStaging {
            ...
            resValue "string", "CodePushDeploymentKey", '"<INSERT_STAGING_KEY>"'
            // Note: It's a good idea to provide matchingFallbacks for the new buildType you create to prevent build issues
            // Add the following line if not already there
            matchingFallbacks = ['release']
            ...
        }
        release {
            ...
            resValue "string", "CodePushDeploymentKey", '"<INSERT_PRODUCTION_KEY>"'
            ...
        }
    }
    ...
}
5. JS代码也需要引入CodePush
import codePush from 'react-native-code-push'

let codePushOptions = { checkFrequency: codePush.CheckFrequency.ON_APP_RESUME }
export default codePush(codePushOptions)(App);
6. 发布到appcenter
$ appcenter codepush release-react -a zruilin/Awesomeproject -d Staging -t 1.0.0 -m --development false --description hello...
查看创建的应用:appcenter apps list
7. CodePush私有部署版
如果已经部署了codepush私有服务,则安装
$ npm install -g code-push-cli@2.1.9
登录
code-push login http://172.26.130.47:3000
查看app key
code-push deployment ls xh-android --k
四、问题记录
1. 报错:Non-whitespace before first tag.
原因:不要在工程目录下放打包的.apk(参考:https://github.com/invertase/react-native-firebase/issues/2179)
/Users/[UserName]/.gradle/caches/transforms-3/650da0710ee913bbca78c9b54dabf437/transformed/jetified-react-native-0.71.0-rc.0-debug-api.jar